The new returns portal maintains the familiar return flow while introducing significant improvements in usability, design, validation, and flexibility. It is designed to provide a smoother, more transparent experience for customers while giving businesses more control through configurable settings in the ZigZag Returns & Exchanges app.
This article provides a detailed, step-by-step overview of all portal pages and the complete customer journey.
Out of Scope
This article does not cover the following features, which are documented separately:
- Shop Now functionality and redirection to the online store
- Bonus configuration for Store Credit and Gift Card refund options
- Exchange for a different product logic and configuration
- Payment processing and payment page (covered in the Stripe integration documentation)
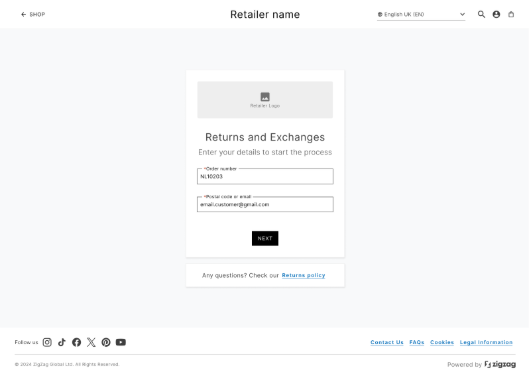
- Landing Page
The Landing Page is the entry point to the returns portal.
[Landing Page – input fields and Next button]
Required Information
To initiate a return, customers must provide:
- Order number
- Email address associated with the order
If the order does not include an email address, customers can alternatively provide a phone number.
Validation Logic
- The Next button remains disabled until all required fields are completed
- Once clicked, the system validates the provided details against order records
- If validation fails:
- A clear error message is displayed
- Customers must correct the input before proceeding
Additional Elements
A Returns Policy link is available on this page. The policy content is fully configurable within the app. This ensures customers can review return conditions before starting the process.
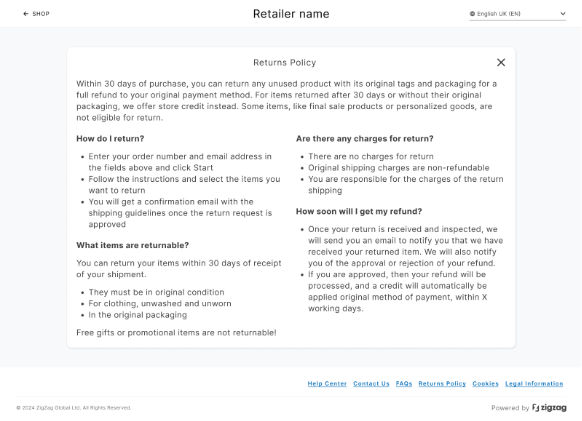
[Returns Policy page]
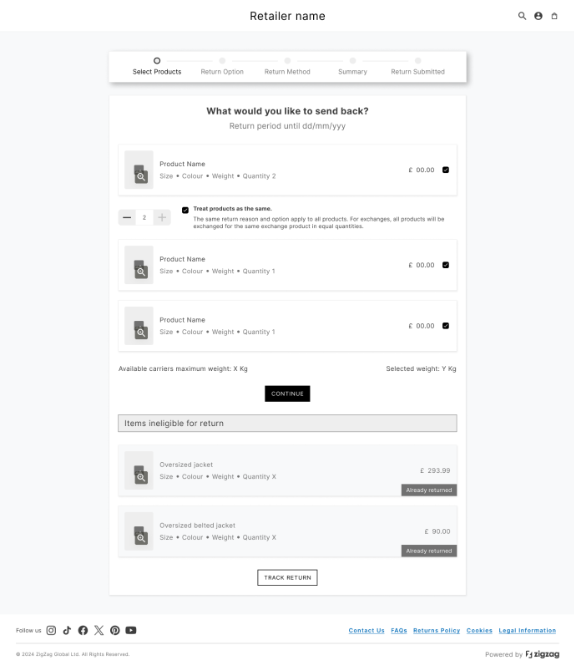
- Select Products Page
After successful validation, customers are redirected to the Select Products page.
Product Eligibility
The system evaluates each product in the order and categorizes them as:
[Select Products page – eligible vs non-eligible items]
Eligible for return
Products that meet all return conditions.
Not eligible for return
Products that fall into one or more of the following categories:
- A return request has already been submitted
- The product has already been returned
- The product has not yet been fulfilled
- The product is marked as non-returnable in the app
- The return window has expired
Non-eligible products are still displayed for transparency but cannot be selected.
Track Existing Returns
If a product has already been returned, a Track Return button is displayed.
- Clicking this button opens the Track Return Page
- Customers can view status, tracking details, and related information
Product Information Display
Each product includes:
- Product name and image
- Variant details (e.g., size, color)
- Original quantity
- Price
- Weight
Return Window Visibility
- If all items share the same fulfillment date → a single return window is shown
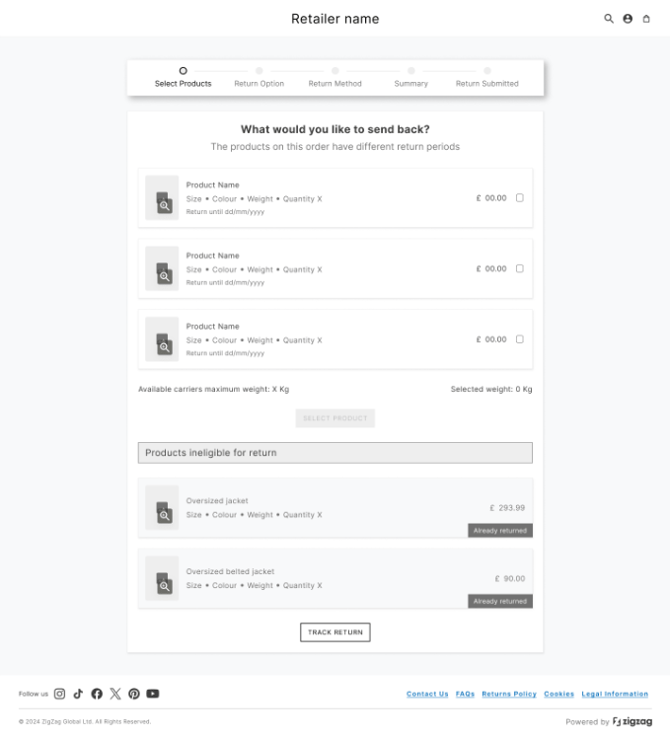
[Return window display per product]
This ensures full transparency regarding eligibility.
Quantity Selection
If multiple quantities were purchased:
- Customers can select how many units to return
- By default, the maximum available quantity is selected
“Treat as the Same” Option
When returning multiple quantities of the same product, customers can enable “Treat as the same” checkbox. This means:
- All selected units will share the same return reason and return option in the next step
-
- If disabled, each unit can be processed individually
- If disabled, each unit can be processed individually
[“Treat as the same” checkbox]
This provides flexibility for mixed-conditioned returns.
Weight Calculation & Validation
The portal integrates with carrier services that can be configured in Carriers & Labels on the app, each with maximum parcel weight limits. The system calculates the total weight of selected products in real time. This is compared against carrier service limitations. The system identifies the highest available limit among configured services.
If weight exceeds limits:
- A warning message is displayed
- Some or all carrier services may become unavailable in later steps
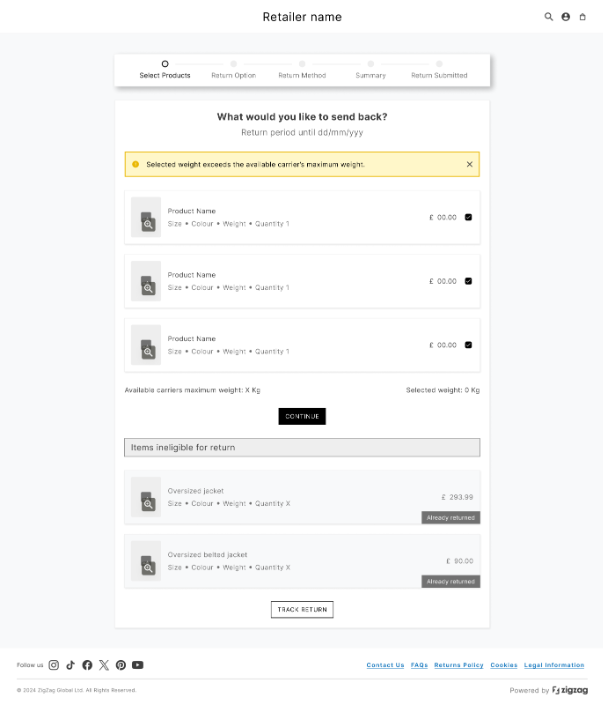
[Overweight warning message]
Important: This does not prevent the customer from continuing the return process.
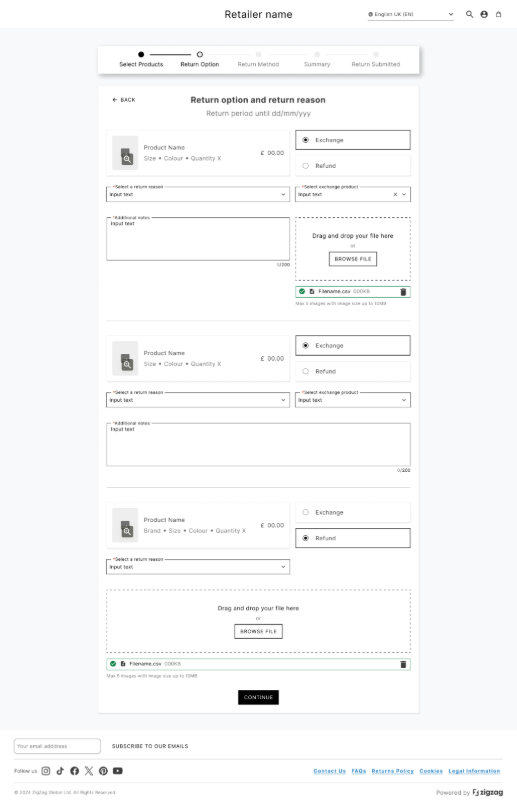
- Return Options Page
This page collects key return details for each selected product.
Required Inputs
For each product, the customer must:
- Select a return option
- Select a return reason
[Return options page]
Return Options
Available options depend on app configuration:
Refund
Displayed if at least one refund method is enabled:
- Refund to original payment method
- Refund to Gift Card
- Refund to Store Credit
At this stage, customers select only Refund. The specific refund method is chosen later.
Exchange
Displayed if exchange options are enabled:
- Exchange for the same variant
- Exchange for a different product
Only one option (Refund or Exchange) can be selected per item. However, the combination of return options can be applied for different products within the same return.
Return Reasons
Customers must select a return reason from a dropdown list.
- The return reasons to be shown on the portal are fully configurable in the app
- This helps businesses collect structured return data
Exchange Product Selection
If Exchange is selected, customer has to fill exchange product from the respective dropdown. The available selection depends on configuration in the app:
Scenario 1 — Exchange for the Same variant only is enabled in the app
- Dropdown shows only available variants of the original product
Scenario 2 — Exchange for the Same variant + different product are enabled in the app
- Dropdown shows variants
- Search field allows finding other products
Scenario 3 — Browse store option is enabled in the app
- Customers can navigate to the store and select a product
- After selection:
- Customer returns to the portal
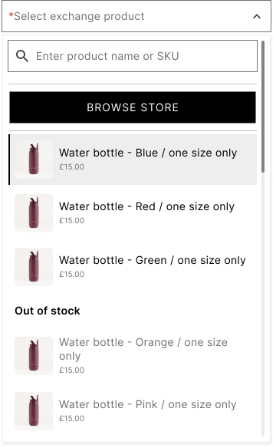
[Exchange dropdown – same variant + search + Browse store]
Note: The exchange quantity always matches the return quantity.
Notes and Image Upload
Customers may also add notes/comments and/ or upload images
These fields:
- Can be optional or required
- Are controlled via app settings
Validation
When clicking Continue:
- Missing required fields are highlighted
- Invalid inputs must be corrected
- Only fully valid submissions can proceed
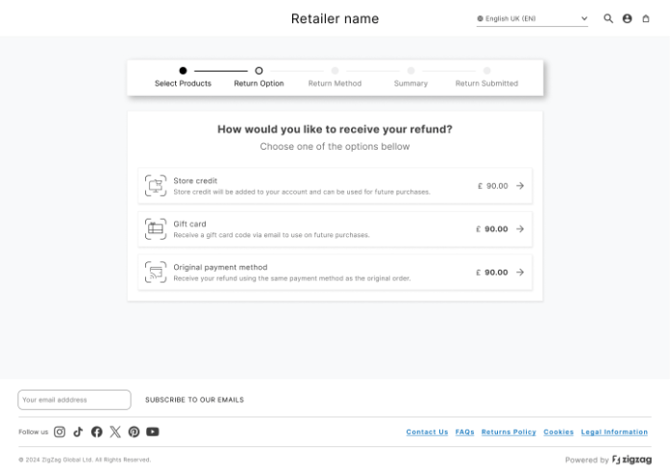
- Refund Options Page
This page is shown only when a refund balance exists.
[Refund option page]
When It Appears
- Refund selected
- Exchange value is lower than returned items
- Mixed return resulting in remaining refund
Available Options
Customers can select from return refund options enabled in the app:
- Original payment method
- Gift Card
- Store Credit - only available for Shopify plus users
Thus, if something is disabled in the app’s settings, it won't be visible for the customer on that page. If only one option is available, this step is skipped automatically.
- Return Method Page
After completing return options (and selecting a refund method, if applicable), the customer is taken to the Return Method page.
This step defines how the items will be returned and which carrier service will be used.
Step 1: Select Return Method Type
The portal supports two main return methods:
- Drop-off – the customer ships the parcel using a carrier
- Collection – the parcel is collected from the customer’s address by a carrier
The system determines which options to display based on the Return journeys configuration in the app:
- If at least one Drop-off service is configured → Drop-off option is shown
- If at least one Collection service is configured → Collection option is shown
Each method displays:
- A short description
- The starting price (minimum cost among available services of that type)
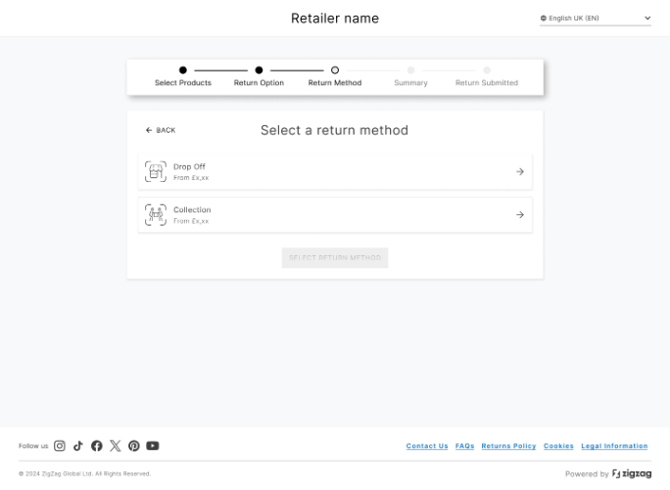
[Return Method page – initial view]
Step 2: (Collection only) Provide Collection Details
If the customer selects Collection, an additional form is displayed.
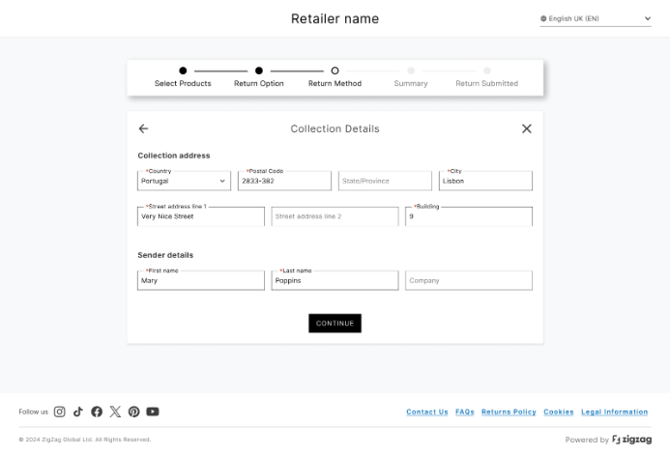
[Collection address form]
This form is:
- Pre-filled using data from the original order
- Fully editable by the customer
Typical fields include:
- Full name
- Phone number
- Address (street, city, postcode, country)
After confirming the details and clicking Continue, the system proceeds to service selection.
Step 3: Select Carrier Service
Once the return method type is chosen (and collection details confirmed, if applicable), the customer is presented with a list of available carrier services.
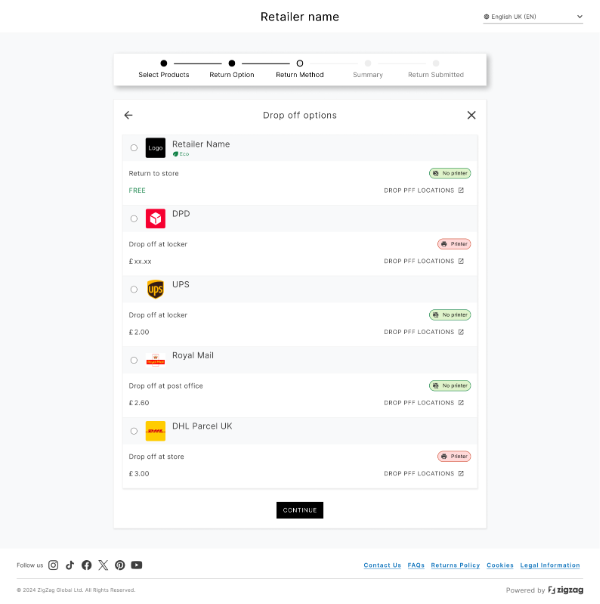
[Carrier services list]
Each service includes:
- Service name
- Price
- Label type (e.g., printable label or QR code)
- For Drop-off:
- A link to available drop-off locations
Service Availability Logic
The list of services depends on:
- App configuration
- Selected return method (Drop-off or Collection)
- Parcel constraints (e.g., weight)
If the selected items exceed carrier limitations (e.g., weight), some services may not appear.
Step 4: Review and Edit Return Details
After selecting a service, additional sections become visible.
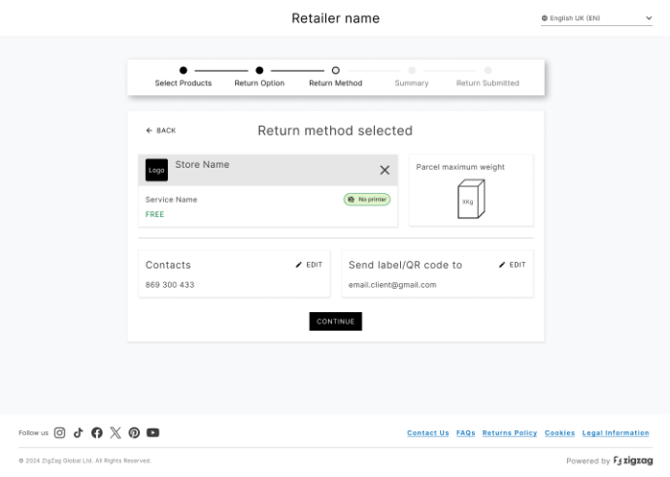
[Service details with editable sections]
These include:
Parcel Information
- Displays parcel-related constraints such as:
- Maximum supported weight
- Helps customers ensure their package meets carrier requirements
Contact Details
- Pre-filled using original order data
- Customer can edit if needed
- Includes Phone number only
Label / QR Code Delivery
- Defines where the return label or QR code will be sent
- Pre-filled with the order email
- Can be changed by the customer
Collection Address (Collection only)
- Displays the address provided earlier
- Fully editable before proceeding
Step 5: Validation
Before proceeding, the system performs several validations:
- Required fields check
- Email format validation
- Phone number format validation
If any issues are detected:
- Fields are highlighted
- Clear error messages are shown
- The customer cannot proceed until resolved
Step 6: Continue
Once all required information is valid, the customer clicks Continue to proceed to the Return Summary Page.
- Return Summary Page
The Return Summary Page provides a complete overview of the return before submission. It is the final step where the customer reviews all details.
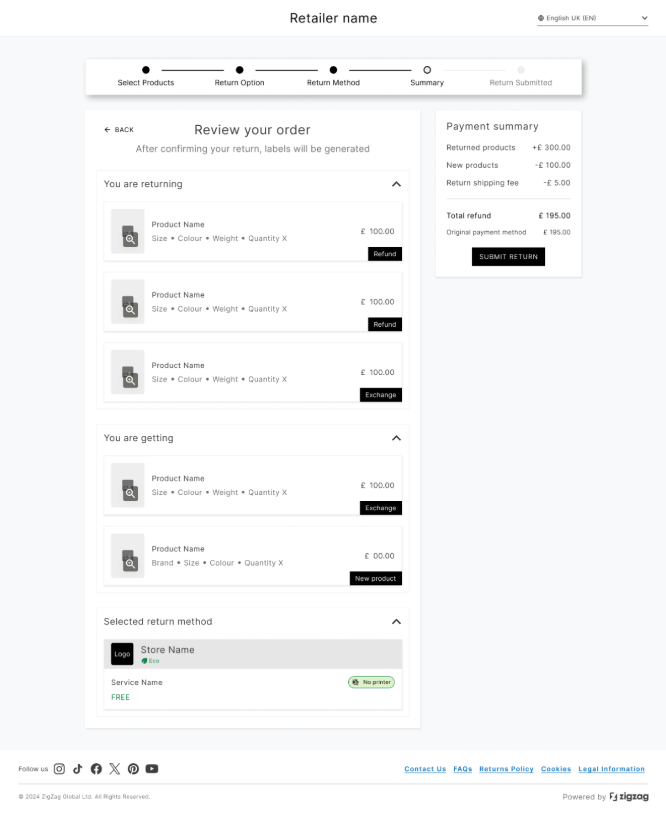
[Return Summary page – full layout]
Page Structure
The page is divided into clearly structured sections (cards), which can typically be expanded or collapsed.
Section 1: “You are returning”
This section shows:
- All selected return items
- Product details (name, variant, quantity, price)
- A badge indicating the selected return option:
- Refund
- Exchange
Section 2: “You are getting”
This section appears only if exchange or Shop now items are selected.
It shows:
- Products the customer will receive
- Quantity and pricing details
Section 3: “Selected return method”
This section summarizes:
- Chosen carrier service
- Return method (Drop-off / Collection)
- Service price
- Label type
Payment Summary
A dedicated Payment Summary card provides a financial breakdown of the return.
How values are displayed:
- Negative values (−) represent amounts refunded to the customer:
- Returned items
- Refund of outbound Shipping fees (if applicable)
- Positive values (+) represent payments from the costumer:
- Exchange items
- Return fees
Calculation Logic
The total is calculated as:
Total = Exchange items + Return fee - Returned items - Shipping fee
Final Outcome
The system clearly communicates the result:
- If the total is negative → the customer will receive a refund
- If the total is positive → the customer will need to pay the difference
The final amount reflects:
- Selected refund method
- Any configured bonuses (Store Credit / Gift Card), if applicable
Submitting the Return
After reviewing all details:
- The customer clicks Submit return
- The return request is created in the system
- All selections and data are saved
- Return Confirmation Page
After successful submission, the Return Confirmation Page is displayed.
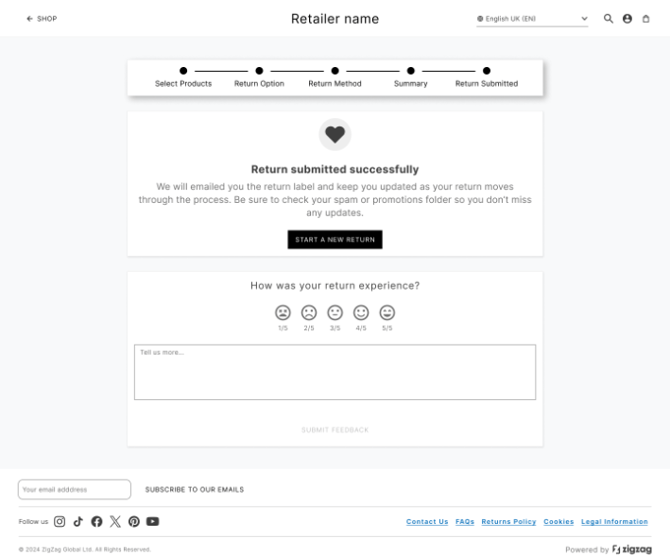
[Return Confirmation page]
What the Customer Sees
- A confirmation message indicating the return was successfully created
- A clear indication that no further action is required at this stage
Available Action
- Start a new return button
- Redirects the customer back to the Landing Page
- Track Return Page
The Track Return Page allows customers to monitor previously submitted returns.
It can be accessed from the Select Products page (via the “Track Return” button).
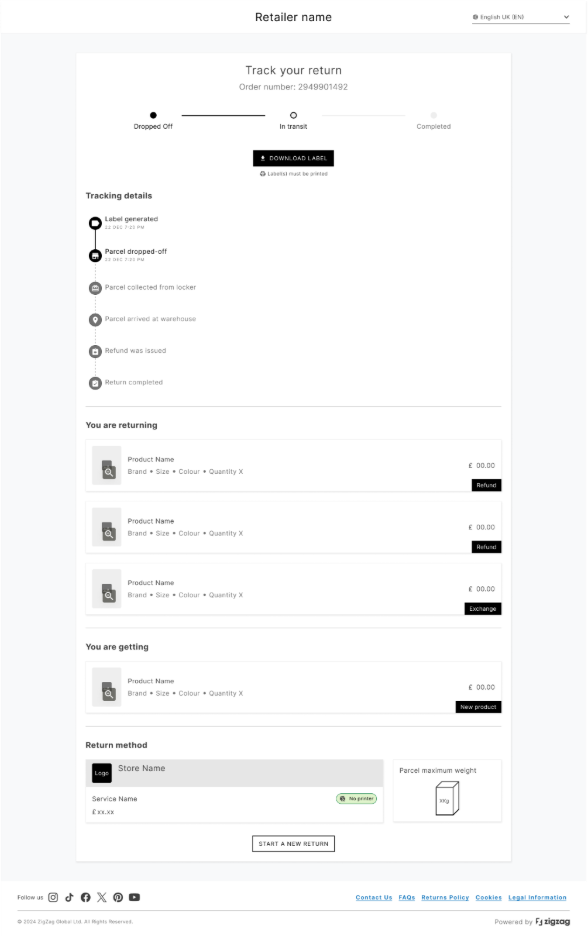
[Track Return page – overview]
Information Available
For each return, the customer can see:
- Return status (e.g., pending, approved, completed)
- Tracking information (if available)
- Returned items
- Exchange items (if applicable)
- Selected return method and carrier details
Label Access
Customers can:
- Download the return label directly from this page
- Avoid searching for the email with the label
Multiple Returns Handling
If multiple return requests exist for the same order:
- They are grouped together
Each return can be expanded individually 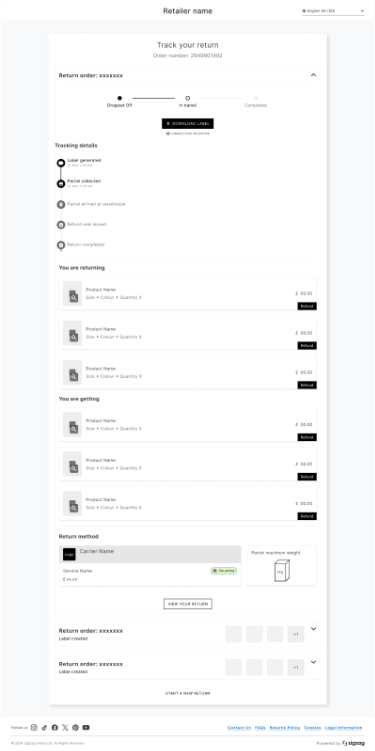
[Multiple returns grouped view]
Additional Action
- Customers can initiate a new return from this page